Saving Bells of Ireland Seed
This post is part of my series on saving cut flower seeds.
Please see the Save Your Own Cut Flowers post about methods for selecting, harvesting, processing, and storing your seeds!
Bells of Ireland
Moluccella laevis
Ugh, she sure is tough to save, but so worth it! Bells are an essential green thing, and they are stunningly beautiful, especially their tiny whale tail-shaped flowers. I save Bells of Ireland seed because I get much better germination on these than store-bought seeds.
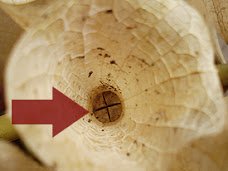
Bells should be left to mature on the plant until you can see the little “cross” of four BROWN seeds in the bottom of the bell, obviously separated by a space. This can take a while, and you will not like how the disintegrating patch looks in your cutting garden. Be patient. Once the bells have really dried down, even to the point of becoming white and disintegrating, get out your toughest gloves (they are really spiney!) and start stripping the stalks into a labeled bucket. DO NOT leave your seed in these buckets. They MUST be spread on a screen to dry or they will mold— this is because there’s so much plant material around the seed.
After a good 2 weeks of drying, get ready for more fun. Get out your tough gloves and a big screen, and rub rub rub a dub your seeds across it until you’ve really mashed any remaining bells into dust. You should start to see the tiny pyramid-shaped seeds. I also have fun grabbing the bell by the very tip and squeezing until they pop like a cannon 😅. The rubbing process takes a while, but it helps if your bells are truly dry.
After rubbing, pass your batch through your screens and winnow to remove light material. You should get a good amount of seed that will be much less expensive than buying it in and will germinate like a dream. Store in a freezer if you have space, or in a cool dark place that has a stable temperature.
For more on seed saving and other gardening topics, check out my workshops!
A pretty clean batch of Bells of Ireland seed. This was from a 25-foot bed that I let go.
The tiny little cross of the four brown seeds inside the bell. See Mr. Brown Thumb for more on this image.
A quickly and vigorously germinating bed of Bells of Ireland from saved seed.


